Furnace Editor
The Furnace Editor Window allows you to enter information about the Furnaces and other equipment in your facility that Load Entry will control or keep track of. You can then assign the furnace to the desired Operations, Groups , and set Report Options.
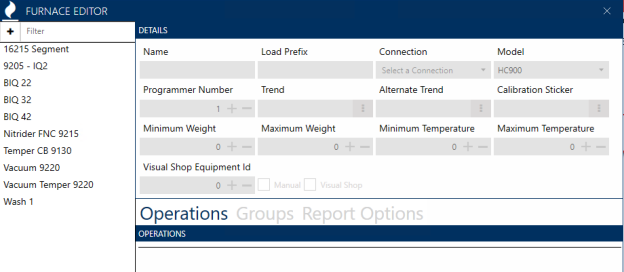
Furnace Details Panel
The Details Panel allows you to assign various fields to your furnace information. The available options will vary based on what you have selected in the Options Editor, but in general will include Name, Load Prefix, Connection, Model, Programmer Number, Trend, Alternate Trend, Calibration Sticker, Min and Max Weight and Temps, and and Visual Shop integration information.
NOTE: If the furnace is Visual Shop integrated, the Visual Shop Equipment Id must match the asset’s id in Visual Shop in order to use the tracking feature.
Operations Tab
To assign a furnace to an existing operation, select the desired operation from the dropdown menu, and then click  .
.
The operation will now be added to the operations list below the dropdown menu. The operations list is clickable – clicking on an item in the list will bring up that operation’s information.
To delete an operation from the list, right-click on it and select “Delete.”
Groups Tab

Clicking the “Groups” tab will bring up options for Overview Groups Assignments. This will assigns your furnaces to various groups for easy viewing in your overview screen.
The functionality of the Groups menu is identical to that of the “Operations” tab.
The “Groups”  button allows you to organize the Furnaces displayed on the Overview window into groups.
On the Overview Groups Editor window, simply click the New button and enter a group name in order to create a new group.
Or, use the dropdown menu to select an existing group.
“Manage Groups” allows you to adjust the order the groups will be displayed in on the Overview Page.
When completed, click “Save.” You will now have the option to assign furnaces to your new group by using the “Overview Group Assignments” panel on the Furnace Editor Window.
When you are finished assigning furnaces to groups, the Overview Window will display your Furnaces by groups. (NOTE: You may need to restart the application for the new group to appear in the Overview screen.)
Report Options Tab
The Report Options Tab allows you to create One Time Reads and Time Stamps for your furnaces. Use the drop-downs to assign the relevant information.
When finished with the Furnace Editor, click “Apply” save changes.
NOTE: If an Overview Group is displayed in bold italics within the list view,
this indicates that it contains unsaved changes.